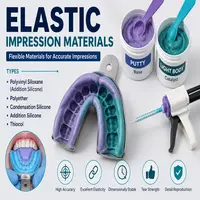
Elastic Impression Materials
Every accurate crown, bridge, or denture starts with one simple step: a good impression. Dentists rely on elastic impression materials to capture the fine details of teeth and gums so that lab technicians can create restorations that fit perfectly. Without these materials, even the most skilled dentist would struggle to replicate the exact shape of a patient’s mouth.
In this article, we will explore what these materials are, how they work, and why they remain a cornerstone of restorative dentistry. Additionally, we will look at the different types available, how professionals choose between them, and what the future holds for this essential category of dental products.
What Are Elastic Impression Materials?
Elastic impression materials are flexible substances used to record the precise shape of teeth, gums, and surrounding oral structures. Unlike rigid materials, they can stretch slightly and then return to their original form, which allows them to be removed from the mouth without distortion. This flexibility is what makes them ideal for capturing undercuts, gaps between teeth, and other tricky anatomical features.
Furthermore, these materials set through a chemical reaction rather than simply drying out. As a result, dentists get a consistent, reliable copy of the mouth every time. Meanwhile, the material’s elasticity ensures that once removed, it snaps back to its original shape instead of tearing or permanently deforming.
Most dental professionals categorize these products based on their chemical composition and physical properties. However, all of them share one common goal: to produce a highly accurate, stable impression that a lab can use to fabricate crowns, bridges, dentures, or orthodontic appliances. Consequently, the quality of the final restoration often depends directly on the quality of the impression material used.
Types of Elastic Impression Materials
There are several categories of elastic impression materials, each suited to different clinical situations. For instance, some are better for single-tooth restorations, while others work best for full-arch impressions. The table below summarizes the most common types used in dental practices today.
| Material Type | Common Use | Setting Time | Accuracy |
|---|---|---|---|
| Alginate (Irreversible Hydrocolloid) | Study models, orthodontic casts | 1–2 minutes | Moderate |
| Polysulfide Rubber | Crown and bridge work | 6–10 minutes | High |
| Condensation Silicone | Single crowns, inlays | 5–7 minutes | High |
| Addition Silicone (PVS) | Crowns, bridges, implants | 2–5 minutes | Very High |
| Polyether | Fixed prosthodontics, implants | 3–6 minutes | Very High |
Alginate remains popular for quick, low-cost impressions, especially for study models. On the other hand, polyether and addition silicone are preferred for precision work such as crowns and implant-supported restorations, since they offer superior dimensional stability. Similarly, polysulfide rubber still finds use in certain long-span bridge cases because of its excellent flow characteristics.
Notably, each material behaves differently once it sets. Some materials, like alginate, must be poured quickly to avoid distortion. Some materials, like addition silicone, can sit for days before pouring without losing accuracy. Therefore, choosing the right type isn’t just about cost — it’s about matching the material’s properties to the clinical task at hand.
How Dentists Choose the Right Material
Selecting the ideal material depends on several factors, including the type of restoration, the patient’s oral anatomy, and the lab’s requirements. In addition, cost and shelf life often play a role in everyday clinical decisions.
For example, a dentist working on a single crown may prefer addition silicone because of its high tear strength and excellent detail reproduction. Meanwhile, a dentist taking impressions for orthodontic study models might choose alginate simply because it is affordable and fast-setting. As a result, no single material works best for every case.
Patient comfort also matters a great deal. Some patients have sensitive gag reflexes, so dentists often choose faster-setting materials to reduce the time spent in the mouth. Similarly, patients with latex allergies require materials free from latex-based components, which rules out certain older formulations. Consequently, dentists must weigh clinical accuracy against patient tolerance when making their final choice.
Moreover, moisture control in the mouth influences material selection. Polyether, for instance, tends to perform poorly in the presence of excess saliva, whereas addition silicones handle mild moisture more gracefully. Therefore, a thorough understanding of each material’s strengths and weaknesses helps dentists deliver predictable, high-quality results.
Step-by-Step Impression Taking Process
Taking a dental impression follows a fairly standard workflow, regardless of which material is chosen. The flowchart below outlines the general process from preparation to final delivery.
START
  │
  ▼
Select Appropriate Tray & Material
  │
  ▼
Prepare Patient (moisture control, gag reflex management)
  │
  ▼
Mix Material (manual or automixing system)
  │
  ▼
Load Tray and Insert into Mouth
  │
  ▼
Wait for Setting Time
  │
  ▼
Remove Impression with a Quick, Firm Pull
  │
  ▼
Inspect for Voids, Tears, or Distortions
  │
  ▼
Disinfect Impression
  │
  ▼
Pour Model or Send to Lab
  │
  ▼
END
First, the dentist selects a tray that fits the patient’s arch comfortably. Then, the material is mixed either by hand or through an automixing gun, which tends to reduce air bubbles and human error. Afterward, the loaded tray is inserted and held steady until the material fully sets.
Once the setting time has passed, the dentist removes the impression with one smooth, firm motion to avoid tearing. Subsequently, the impression is inspected closely for voids or distortions before being disinfected and sent for pouring. This entire sequence, though it looks simple on paper, requires practice and precision to execute consistently.
Advantages and Limitations
Like any dental product, elastic impression materials come with both strengths and drawbacks. The table below highlights the key advantages and limitations across common categories.
| Aspect | Advantage | Limitation |
|---|---|---|
| Flexibility | Captures undercuts easily | Can distort if stretched too far |
| Setting Time | Fast options available | Fast-setting types leave little working time |
| Cost | Alginate is very affordable | High-precision types cost more |
| Storage | Silicones store well long-term | Alginate must be poured quickly |
| Comfort | Many options taste-neutral | Polyether can taste bitter |
Despite these limitations, most modern formulations have improved dramatically over the last decade. For example, newer addition silicones now offer hydrophilic properties, which help them perform better even in slightly moist environments. Nevertheless, no material is perfect, so dentists must still manage technique carefully to avoid common errors like bubbles or premature removal.
Latest Trends in Elastic Impression Materials
The dental industry continues to innovate, and elastic impression materials are no exception. Digital intraoral scanning has grown rapidly, yet traditional materials still dominate many practices due to their reliability, affordability, and proven track record. In fact, many dentists now use a hybrid approach, combining digital scans with conventional materials depending on the case complexity.
Manufacturers are also focusing on faster setting times without compromising accuracy. Similarly, eco-friendly packaging and reduced-waste automixing cartridges have become more common as practices aim to lower their environmental footprint. Meanwhile, research into smart materials that change color to indicate optimal removal time is gaining attention in dental journals.
Ultimately, while digital workflows are expanding, elastic impression materials remain deeply embedded in everyday dental practice. Their proven accuracy, ease of use, and cost-effectiveness ensure they will stay relevant for years to come.
Conclusion
Elastic impression materials play a vital role in producing accurate, comfortable, and long-lasting dental restorations. From alginate’s affordability to the precision of addition silicone and polyether, each material serves a distinct purpose in the clinical workflow. Choosing the right one depends on the case, the patient, and the desired level of accuracy.
As dental technology continues to evolve, these materials are adapting alongside digital tools rather than disappearing. Therefore, understanding their properties, proper handling techniques, and ideal use cases remains essential knowledge for every dental professional. Whether you’re a student, a practicing dentist, or simply curious about how dental restorations are made, knowing how these materials work offers valuable insight into the craftsmanship behind a healthy, confident smile.
Frequently Asked Questions
An elastic dental material can stretch or bend slightly during removal from the mouth and then return to its original shape without permanent distortion, which is crucial for capturing accurate impressions around teeth and undercuts.
Addition silicone (PVS) and polyether are generally considered the most accurate options, offering excellent detail reproduction and long-term dimensional stability compared to alginate.
This varies by material. Alginate should be poured within minutes, while addition silicones can often be stored for several days without losing accuracy, making them more convenient for busy practices.
Most modern formulations are latex-free, but dentists should always check the product label and confirm with the patient beforehand, especially for those with known sensitivities.
Not entirely, at least not yet. While digital intraoral scanners are growing in popularity, many practices still rely on traditional materials due to cost, familiarity, and proven reliability in complex cases.