Rigid Impression Materials
Dental impressions capture the exact shape of teeth and gums. Without accurate impressions, crowns, bridges, and dentures never fit right. Rigid impression materials play a major role in this process, especially for cases that demand precision and stability.
This guide explains what these materials are, how they work, and where dentists use them most. We will also cover common types, techniques, and mistakes to avoid. By the end, you will understand why choosing the right material matters so much for patient outcomes.
What Do Dentists Mean by “Rigid” Materials?
These materials set into a firm, inflexible structure once they cure. Unlike elastic materials, they do not stretch or bend after setting. Consequently, they cannot pull past small undercuts in the mouth without breaking.
Dentists mainly use these materials for edentulous patients or simple cases without deep undercuts. Because rigid materials hold their shape so well, they produce highly stable impressions for certain applications. However, their inflexibility also limits where dentists can safely use them.
Understanding this trade-off helps clinicians pick the right material for each case. A rigid material works beautifully for a flat ridge. Meanwhile, it fails quickly around a tooth with sharp undercuts.
Why Rigidity Matters in Dental Impressions
Rigid materials resist distortion under pressure. So, they maintain dimensional accuracy even when stored for a short period before pouring the cast. This stability makes them valuable for denture bases and edentulous ridges, where precision affects the final fit significantly.
Additionally, rigid materials often cost less than flexible alternatives. Therefore, many practices still keep them stocked for specific procedures. Their simple handling also appeals to clinicians who want predictable, straightforward results without complex mixing steps.
However, rigidity becomes a drawback in complex cases. Teeth with undercuts, tight contacts, or irregular anatomy need flexible materials that can stretch during removal. Using a rigid material in these situations often leads to fractured impressions or inaccurate models.
Temperature also plays a role in how these materials behave. Some rigid options soften slightly with heat before setting fully, which allows minor adjustments during placement. Once the material cools or chemically sets, however, that flexibility disappears completely. Clinicians should plan their working time carefully around this narrow window.
Common Types Used in Clinical Practice
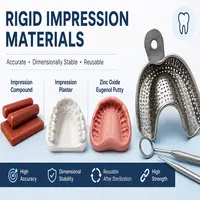
Several materials fall under this category, each with unique properties and uses.
| Material | Composition | Common Use |
|---|---|---|
| Impression Plaster | Gypsum-based powder | Edentulous ridges, denture impressions |
| Impression Compound | Thermoplastic resin | Preliminary impressions, custom trays |
| Zinc Oxide Eugenol | Zinc oxide and eugenol paste | Final impressions for dentures |
| Metallic Oxide Paste | Oxide-based paste | Border molding, mucostatic impressions |
Impression plaster remains one of the oldest materials still in clinical use. It sets quickly and reproduces fine surface detail well. Meanwhile, impression compound softens with heat, allowing dentists to reshape it before it cools and hardens again.
Zinc oxide eugenol pastes offer excellent surface detail for mucostatic impressions, where minimal tissue displacement matters most. Metallic oxide pastes serve a similar purpose during border molding, capturing the fine contours of the vestibule accurately. Each material brings a slightly different balance of setting time, detail reproduction, and handling comfort.
How Rigid Materials Compare to Elastic Materials
Dentists often choose between rigid and elastic impression materials based on the clinical situation. This comparison clarifies the key differences.
| Feature | Rigid Materials | Elastic Materials |
|---|---|---|
| Flexibility after setting | None | High |
| Best for undercuts | No | Yes |
| Dimensional stability | Excellent | Good to excellent |
| Typical cost | Lower | Higher |
| Common examples | Plaster, compound | Alginate, silicone |
This table shows why dentists cannot rely on one category alone. Instead, they match the material to the anatomy and clinical goal for each patient.
A Simple Flowchart: Choosing the Right Impression Material
Selecting between rigid and elastic materials sometimes confuses new clinicians. This flowchart simplifies the decision process.
                START
                  |
      Does the area have deep
      undercuts or tight contacts?
                  |
        ---------------------
        |                   |
       YES                  NO
        |                   |
   USE ELASTIC          Is the case an
   MATERIAL              edentulous ridge
   (Alginate/Silicone)   or denture base?
                              |
                   ---------------------
                   |                   |
                  YES                  NO
                   |                   |
          RIGID MATERIAL         CONSIDER ELASTIC
          (Plaster/Compound)     MATERIAL INSTEAD
This flowchart offers a quick reference during busy clinical days. However, clinical judgment should always guide the final decision, since every patient presents unique anatomy.
Step-by-Step Technique for Using Rigid Materials
A typical clinical workflow follows these steps consistently:
- Tray Selection: Choose a properly fitted tray for the arch.
- Material Preparation: Mix or heat the material according to manufacturer instructions.
- Loading: Fill the tray evenly, avoiding air bubbles.
- Seating: Place the tray firmly and hold it steady until set.
- Removal: Remove the impression carefully along its path of insertion.
- Inspection: Check for voids, tears, or distortion before pouring the cast.
Skipping any step weakens the final result. For instance, uneven loading can trap air bubbles, which distort fine surface details. As a result, the final cast may show inaccuracies that affect the fit of a prosthesis.
Common Mistakes Clinicians Should Avoid
Many practitioners fall into predictable traps with rigid materials. First, using a rigid material on a case with undercuts often causes the impression to fracture during removal. Second, mixing the material incorrectly changes its setting time and strength significantly.
Furthermore, storing plaster or compound improperly weakens its performance over time. Humidity, in particular, degrades gypsum-based products faster than most clinicians expect. Similarly, reheating impression compound too many times can alter its properties and reduce accuracy.
Regular training helps prevent these errors. Clinicians who review manufacturer guidelines periodically tend to report fewer remakes and better-fitting final restorations.
Storage and Handling Tips
Proper storage extends the shelf life of these products considerably. Gypsum-based options need a cool, dry environment away from moisture. Meanwhile, thermoplastic compounds should stay away from direct sunlight and excessive heat, which can soften them prematurely.
Labeling containers with expiration dates also helps staff track freshness. Additionally, sealing containers tightly after each use prevents contamination and keeps the material consistent across multiple uses. These small habits protect both material quality and patient outcomes.
Cross-contamination between different batches also deserves attention. Mixing old and new powder can change setting times unpredictably, which frustrates both clinician and patient. Therefore, many practices label opened containers with the date first used, discarding anything past a reasonable window. This simple habit costs nothing yet prevents avoidable chairside surprises.
Advantages and Limitations at a Glance
Every material choice involves trade-offs. Rigid options bring clear strengths, but they also carry real limitations that clinicians must respect.
- Advantages: Excellent dimensional stability, simple handling, lower cost, and strong performance on flat or edentulous ridges.
- Limitations: No flexibility around undercuts, higher fracture risk during removal, and less comfort for patients compared to some elastic alternatives.
Weighing these factors helps clinicians avoid remakes and wasted chair time. A quick mental checklist before starting any impression saves both the dentist and the patient unnecessary frustration.
Conclusion
Rigid impression materials remain a valuable tool in dentistry, particularly for edentulous ridges and denture bases. Their firm structure delivers excellent dimensional stability, though it limits their use around undercuts and complex anatomy. Impression plaster, compound, and zinc oxide eugenol each offer distinct advantages depending on the clinical situation.
Clinicians who understand these trade-offs make better material choices every day. Ultimately, matching the material to the case matters more than defaulting to habit or convenience. A well-chosen impression material leads to accurate casts, better-fitting restorations, and happier patients.
If your practice has not reviewed its impression material protocols recently, now is a good time. Small adjustments in material selection can lead to noticeably better clinical outcomes.
Frequently Asked Questions
Rigid materials set into a firm, unbending structure. Elastic materials, however, stay flexible after setting and can stretch past undercuts without breaking.
Rigid materials work best for edentulous ridges, denture bases, and flat areas without undercuts. They provide excellent stability in these simpler cases.
No. Rigid materials fracture easily when removed from areas with undercuts. Elastic materials like alginate or silicone handle these situations far better.
Impression plaster needs a cool, dry space away from moisture. Humidity weakens gypsum-based products and shortens their effective shelf life.
Fractures usually happen when the material cannot flex around undercuts. Choosing the wrong material for the case is the most common cause.